...
Now you have installed the target platform, before you launch the product, we are going to add the OdysseusNet monolithic target to the normal monolithic target (see for a general tutorial Adding features to products) :
- Double click the de.uniol.inf.is.odysseus.monolithic.product.product under the directory de.uniol.inf.is.odysseus.monolithic.product.product in the Eclipse Project explorer
- Go the the Contents-Tab
- Add de.uniol.inf.is.odysseus.net.monolithic.feature to the list of features
- Save with CTRL+S
- Go to the Overview-Tab, synchronize and launch the eclipse application, this launches the Odysseus Studio (see Odysseus Studio)
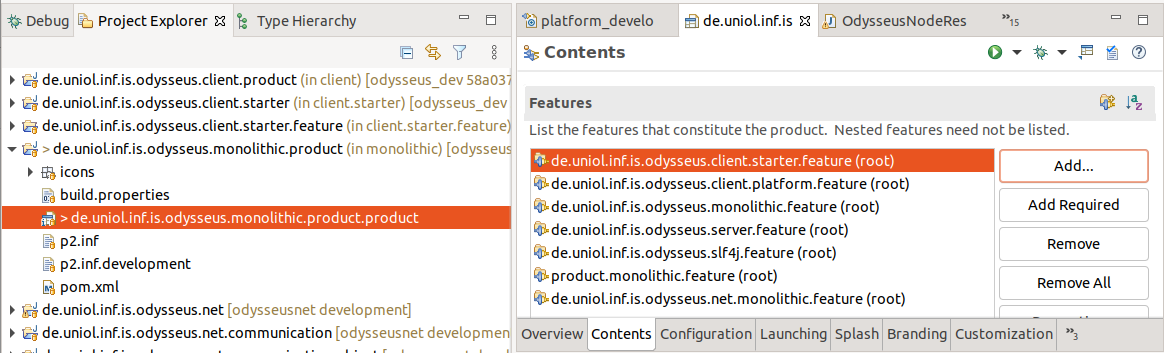
The OdysseusNet monolithic target also includes the OdysseusNet server target.
If successfully started you can close Odysseus Studio for now for changing OdysseusNet config under ODYSSEUS_HOME (OdysseusNet Configuration)
With Linux the ODYSSEUS_HOME (ODYSSEUS_HOME) is ~/.odysseus, there you can change the odysseusNet.config to
| Code Block |
|---|
<?xml version="1.0" encoding="UTF-8"?> <!DOCTYPE properties SYSTEM "http://java.sun.com/dtd/properties.dtd"> <properties> <comment>OdysseusNet Property File edit only if you know what you are doing</comment> <entry key="net.networkoperatorgenerator">websocket</entry> <entry key="net.node.default.username">System</entry> <entry key="net.dd.local">true</entry> <entry key="net.node.name">OdysseusNode_1554</entry> <entry key="net.discoverer.name">BroadcastOdysseusNodeDiscoverer,IPListOdysseusNodeDiscoverer</entry> <entry key="net.querydistribute.allocation">querycount</entry> <entry key="net.source.lifetime">3600000</entry> <entry key="net.connect.selector.name">GroupSelectorComponent</entry> <entry key="net.nodemanager.storetype">filestore</entry> <entry key="net.nodemanager.filename">/home/$USER/.odysseus/store/nodes.store</entry> <entry key="net.dd.checkinterval">30000</entry> <entry key="net.remoteUpdate">false</entry> <entry key="net.node.communicator">rest</entry> <entry key="net.node.preserveid">false</entry> <entry key="net.querydistribute.minport">10000</entry> <entry key="net.autostart">true</entry> <entry key="net.querydistribute.partition">querycloud</entry> <entry key="net.querydistribute.randomport">false</entry> <entry key="net.discoverer.interval">5000</entry> <entry key="net.node.default.password">manager</entry> <entry key="net.node.group">OdysseusGroup</entry> <entry key="net.querydistribute.maxport">20000</entry> <entry key="net.logging.receive">false</entry> </properties> |
Replace $USER with your local user
...
if you want to persist your registered nodes, you could also add:
| Code Block |
|---|
<entry key="net.nodemanager.storetype">filestore</entry>
<entry key="net.nodemanager.filename"><PATHTOHOME>/store/nodes.store</entry> |
In this case you should replace <PATHTOHOME> e.g. with the ODYSSEUS_HOME folder.
Setup of Odysseus worker nodes
Now we start Nexmark (a data stream simulation tool, see Getting Started with Nexmark) and Odysseus worker nodes with docker-compose, therefore create a docker-compose.yml in a directory (it will be named $CURRENT_DIRECTORY here for reference, in practice it could be e. g. the odysseusnet-repo) and with the following content (adopted from OdysseusNet Docker Compose Example):
| Code Block |
|---|
version: '3.3'

services:
    nexmark:
        image: odysseusol/nexmark
        ports:
           - 65440-65443:65440-65443
    worker01:
        image: odysseusol/odysseusnet
        stdin_open: true
        ports:
            - 18881:8888
        volumes:
            - ./worker01:/var/lib/odysseus

    worker02:
        image: odysseusol/odysseusnet
        stdin_open: true
        ports:
            - 18882:8888
        volumes:
            - ./worker02:/var/lib/odysseus

    worker03:
        image: odysseusol/odysseusnet
        stdin_open: true
        ports:
            - 18883:8888
        volumes:
- ./worker03:/var/lib/odysseus |
| Note |
|---|
As of now a normal Ubuntu 20.04 only supports docker-compose yml syntax to version 3.3 instead of 3.8 in Windows as stated in other yml files, but most of them are downwards compatible, because newer features are not that widespread at the moment. |
As a workaround make sure the worker01-03 directories have the 777-permissions with:
| Code Block |
|---|
sudo chmod 777 -R worker0* |
Otherwise the internal Odysseus worker node user cannot access the volume properly and fails.
| Note |
|---|
All configuration files will be placed under the $CURRENT_DIRECTORY, e. g. there are the following files: logs odysseus.conf odysseusNet.conf reloadlog.store scheduling.conf store |
You can then start the docker stack with:
| Code Block |
|---|
docker-compose up -d |
Configuring inside docker compose
As the nodes read their configuration from sytem-properties and enviroment before looking into the config file, you can overwrite the configuration like in the following docker compose example:
| Code Block |
|---|
version: '3.8'

services:
    nexmark:
        image: odysseusol/nexmark
        ports:
           - 65440-65443:65440-65443

    node01:
        image: odysseusol/odysseusnet
        stdin_open: true
        ports:
            - 18881:8888
        environment:
            - net.node.name=node01
            - net.net.discoverer.name=MulticastOdysseusNodeDiscoverer,BroadcastOdysseusNodeDiscoverer,IPListOdysseusNodeDiscoverer
            - net.node.communicator=rest
        volumes:
            - ./node01:/var/lib/odysseus

    node02:
        image: odysseusol/odysseusnet
        stdin_open: true
        ports:
            - 18882:8888
        environment:
            - net.node.name=node02
            - net.net.discoverer.name=MulticastOdysseusNodeDiscoverer,BroadcastOdysseusNodeDiscoverer,IPListOdysseusNodeDiscoverer
            - net.node.communicator=rest
        volumes:
            - ./node02:/var/lib/odysseus

    node03:
        image: odysseusol/odysseusnet
        stdin_open: true
        ports:
            - 18883:8888
        environment:
            - net.node.name=node03
            - net.net.discoverer.name=MulticastOdysseusNodeDiscoverer,BroadcastOdysseusNodeDiscoverer,IPListOdysseusNodeDiscoverer
            - net.node.communicator=rest
        volumes:
            - ./node03:/var/lib/odysseus

    node04:
        image: odysseusol/odysseusnet
        stdin_open: true
        ports:
            - 18884:8888
        environment:
            - net.node.name=node04
            - net.net.discoverer.name=MulticastOdysseusNodeDiscoverer,BroadcastOdysseusNodeDiscoverer,IPListOdysseusNodeDiscoverer
            - net.node.communicator=rest
        volumes:
- ./node04:/var/lib/odysseus |
Setup of Odysseus Webstudio
You can use the Odysseus Webstudio (WebStudio) for monitoring and interacting with the worker nodes. There are two options:
- Only use the webstudio
- Develop the webstudio
Use the webstudio
If you just want to use the Webstudio you should just download the docker-compose.yml file from here:
For Linux: As this is not a root container, you need to give read access to the user of the docker container. The easiest way is to use 777
Develop the webstudio
To install it, first clone the Webstudio-repo (https://git.swl.informatik.uni-oldenburg.de/projects/API_APPS/repos/webstudio/browse?at=refs%2Fheads%2Fdevelopment) and checkout the development-branch with
| Code Block |
|---|
git clone https://git.swl.informatik.uni-oldenburg.de/scm/api_apps/webstudio.git
git checkout -b development |
Then create and give the all permissions to everyone to the following directories as a workaround:
| Code Block |
|---|
mkdir backend
chmod 777 -R backend |
For starting the docker stack you can set the images accordingly in the docker-compose.yml in the home dir
At last you can start the stack with:
| Code Block |
|---|
docker-compose up -d |
Add the nodes in Odysseus Studio
It the view is not available, you should use Window/Show View/other... and then select Nodes from the OdysseusNet section.
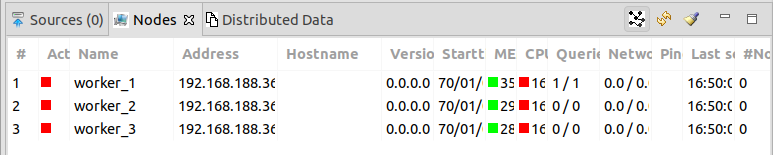
Before you can install queries on the nodes, you have to add the worker nodes with:
| Code Block |
|---|
#CONFIG DISTRIBUTE true
#PARSER PQL

#DEFINE HOST 192.168.188.36
#ADD_NODE (name=worker_1) (serverAddress=${HOST}) (serverPort=18881) (username=System) (password=manager)
#ADD_NODE (name=worker_2) (serverAddress=${HOST}) (serverPort=18882) (username=System) (password=manager)
#ADD_NODE (name=worker_3) (serverAddress=${HOST}) (serverPort=18883) (username=System) (password=manager) |
Install the remote query
Run the following OdysseusScript query in Odysseus Studio.
| Code Block |
|---|
#REMOTEQUERY (name=worker_1)
#PARSER PQL


#RUNQUERY
nexmark:person := ACCESS({source='nexmark:person',
    wrapper='GenericPush',
    transport='TCPClient',
    protocol='SizeByteBuffer',
    dataHandler='Tuple',
    options=[
        ['host', 'nexmark'],
        ['port', '65440'],
        ['ByteOrder', 'LittleEndian']
        ],
    schema=[
        ['timestamp', 'STARTTIMESTAMP'],
        ['id', 'INTEGER'],
        ['name', 'STRING'],
        ['email', 'STRING'],
        ['creditcard', 'STRING'],
        ['city', 'STRING'],
        ['state', 'STRING']
        ]
    })


#RUNQUERY
out = nexmark:person |
| Note |
|---|
Remark, that the host is 'nexmark' instead of 'localhost', because the remote worker node 'worker_01' is started in the default docker network and access the nexmark by the DNS resolved service name 'nexmark' |
See the remote query output
Here is described how you can see the remote query output.
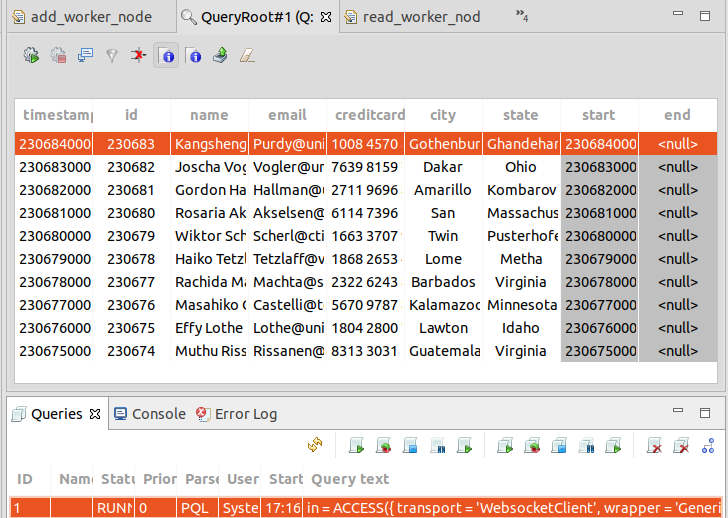
Odysseus Studio
You can the following query in Odysseus Studio to access the output (Reading Query Results via REST/Websocket):
| Code Block |
|---|
#PARSER PQL
#RUNQUERY
in = ACCESS({
    transport = 'WebsocketClient',
    wrapper = 'GenericPush',
    datahandler = 'Tuple',
    protocol = 'CSV',
    source = 'access',
    readMetadata = 'true',
    options = [
        ['uri','ws://localhost:18881/queries/0/a2e1a574-6c72-4961-b304-111c01708445/0/CSV/fif8htets00ql9q71okbuu7qs9']
    ],
    schema = [['timestamp','StartTimestamp'],['id','Integer'],['name','String'],['email','String'],['creditcard','String'],['city','String'],['state','String']]
    }
) |
You have to adjust the optioins-uri in the query with the rootOperators-websockets-CSV uri from http://localhost:18881/queries/0
You can then show the last x elements:
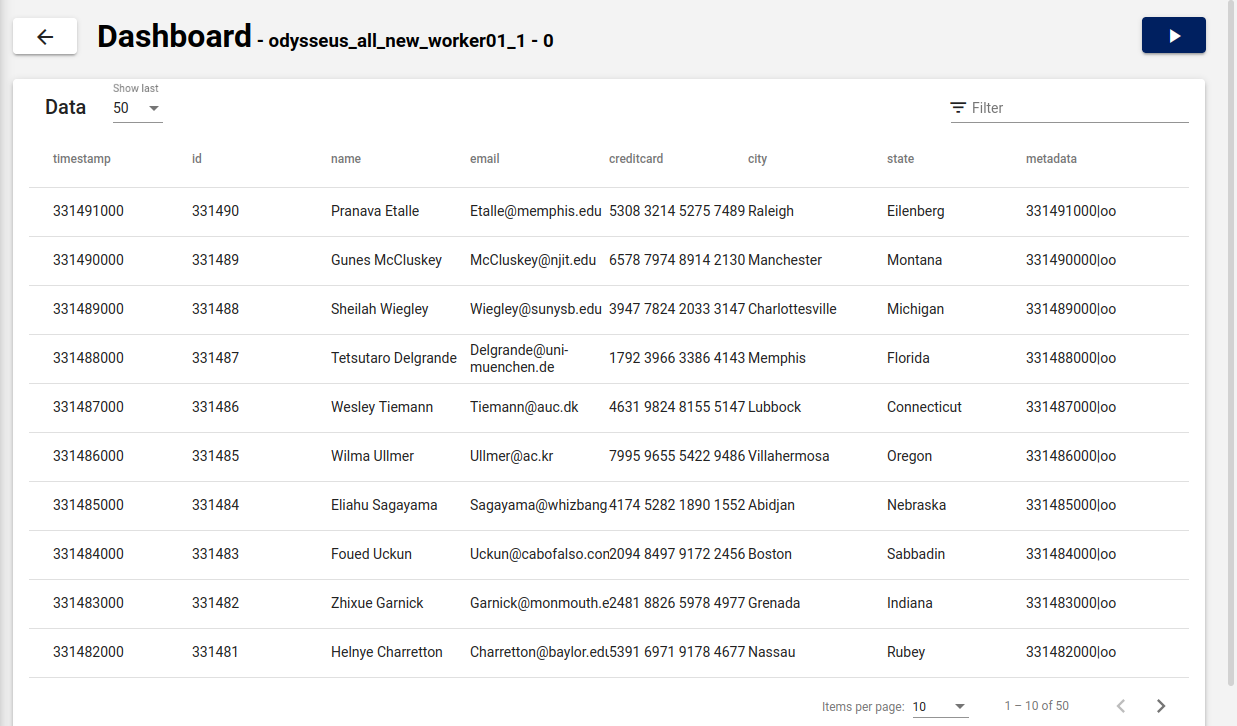
Odysseus Webstudio
In Webstudio you can see the query output unter the queries tab: