Setting up
This section describes how to set up Eclipse and Odysseus for developments.
1. Prerequisites
You will need the following tools:
- Java 7
- Eclipse for RCP and RAP Developers. We recommend to use Eclipse Kepler (Version 4.3)
- SVN Client (see next step for details)
2. Checkout Source Code
The current source code is availabe through SVN:
...
Checkout the source-code. We suggest to checkout the whole trunk-folder outsice of / without Eclipse - e.g. with TortoiseSVN (http://tortoisesvn.net/) in Windows or via the command line tool (http://subversion.apache.org/). Alternativly, experts may also import all directly into eclipse using e.g. subclipse.
...
3. Setup Eclipse
We recommend to use a dedicated Eclipse (Eclipse for RCP and RAP Developers - at least Eclipse version 3.7.1, since Java 7 is needed!) for Odysseus with its own workspace, because there are some configurations that are predefined for a workspace location that is equal to the trunk folder. Therefore, if you firstly started eclipse, you have to choose the trunk folder as the workspace location. Thus, choose the same folder which you used for the checkout and contains subfolders like ac, core, cep etc.workspace for Odysseus, because a full import of Odysseus may have more than 300 Projects.The most simply way is as follows. If you are firstly starting Eclipse, choose the folder where you checked out the source code as the workspace location.
If you have already a workspace, you can switch it via "File -> Switch Workspace -> Other..."
After Eclipse started, you have to import all bundles (these are the parts of odysseus and are equal to a eclipse an Eclipse project). Use "File -> Import -> Existing Projects into Workspace" to import them into Eclipse as follows:
...
After clicking "Next", select all needed projects. In the follwing screenshot, only core (it is a subfolder) and its bundles are selected.
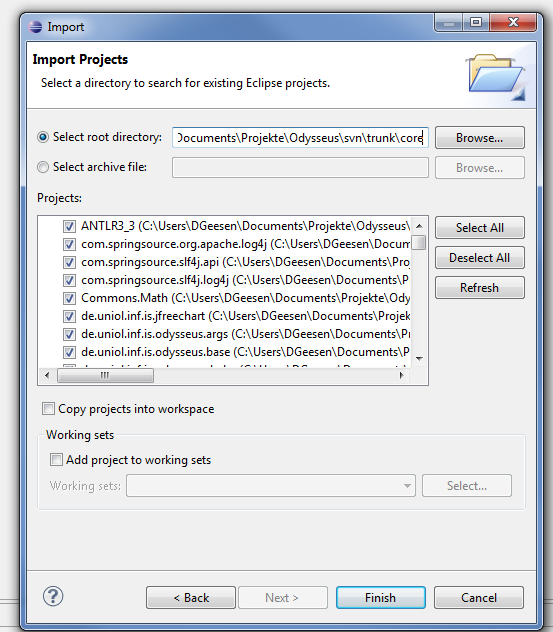
Of couse, depending on the application, it is also possible to select other or even all projects. Each subfolder of trunk normally reflects a special feature, so you can either only import several subfolders/features or all available features if you use trunk as the "Select root directory". However, the core is a minimal set of needed bundles to run odysseus.
.The source code ("trunk") folder has the following subfolders:
- application: this folder contains all applications that use Odysseus or provide any data like generators.
- client: contains all bundles that run on the client and don't have any dependencies to the server directly. It mainly offers the GUI.
- common: this holds common stuff und utilities that are needed on both server and client. Common does not have any dependencies to other folders like server, client...
- monolithic: this folder contains bundles that will only work in a monolithic system where server and client are the same product
- server: this is the server part of Odysseus and contains Odysseus main functionalities. Except of common, it does not have any dependencies to other folders. It does not have any GUI or client functionalities.
- test: contains stuff for testing and benchmarking
- tooling: contains primarily tools for the build controlling (Jenkins)
Although the easiest way would be to import all projects, it is possible to load only different subsets of the main folder.
- For Odysseus and all existing extensions: All projects within "common", "server", "client" and "monolithic"
- For Odysseus' server: "common", "server"
- For GUI only: "common" and "client"
Furthermore, each main folder has different subfolders. Each subfolder normally contains a certain functionality or a dedicated extension (aka plugin for Odysseus). The main functionality of Odysseus is called "core". So, if you want to have a minimal set of bundles for developing, you will need to import the following folders: "common" and the "core"-subfolder within "server".
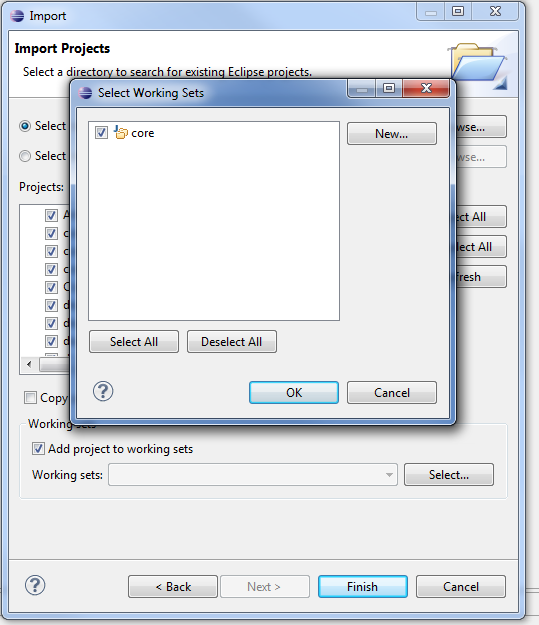
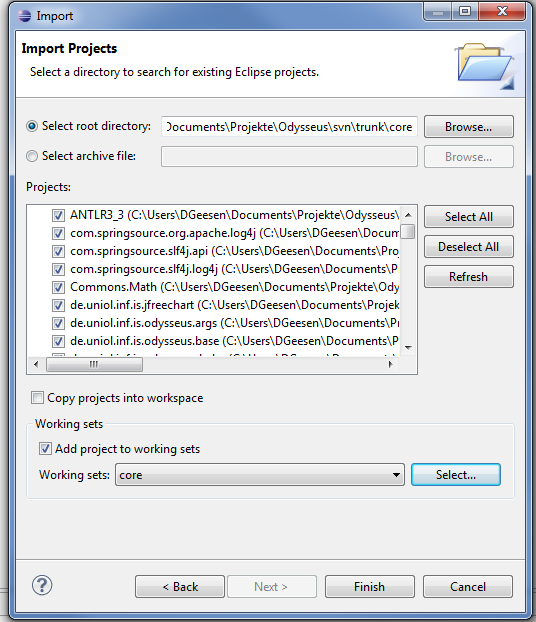
In the follwing screenshot some bundles are selected.
We recommend to create working sets like here to group certain bundles:
...
4. Target Platform
Since Odysseus has some dependencies to other external features like Eclipse GEF or the Equinox framework, it is recommended to use the target-platform definition.
This definition is provided via the "target-platform.target" file and can be found in the bundle/project called "de.uniol.inf.is.odysseus.productcommon.platform.featurrefeature". Open this file and click "Set as target platofrm" to use this as your target platform. Notice, the target platform is valid for your whole workspace (therefore we recommend to use a dedicated workspace for Odysseus development).
If you use the test-features, you have to install testNG into your running platform. you have to do the following:
4.1. Testing (optional)
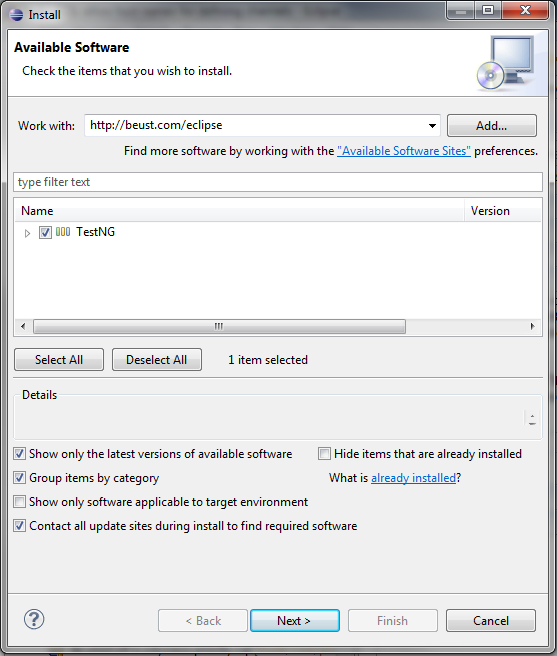
If you want to write tests, we recomnd to install TestNG. This if you need testNG, this feature can be installed through "Help -> Install new Software". Afterwards enter the update site (http://beust.com/eclipse) into the work with field and hit enter.
Select the entry "TestNG" and click "Next" to install the feature. Maybe you have to restart Eclipse after the installation.
...
5. First Run - Available Products
Now, you should be able to run Odysseus. The bundle "de.uniol.inf.is.odysseus.rcp.starter" has There are some predefined product-definitions to run Odysseus (depending on the bundles/folders you checked out before):
- Odysseus Studio 2 (FileStore) - Runs Odysseus with an integrated GUI (called Studio). This configuration saves the state of Odysseus if it is terminated. E.g. all installed sources and queries are restored after Odysseus is restarted.
- Odysseus Studio 2 (MemoryStore) - This is similar to FileStore, but does not save the state. So, each time when Odysseus starts, it has an empty and fresh state.
- Odysseus Studio 2 Server (MemoryStoreServer.product - (located in de.uniol.inf.is.odysseus.server.starter) - This is just a server-based instance of Odysseus (without any GUI) which can be configured among other things used e.g. via a webservice. It is a memory based version (see above).
- Odysseus Studio 2 (Client).product - (located in de.uniol.inf.is.odysseus.client.starter) - This is only the client part (GUI) and it connects to the Odysseus Studio 2 Server via a webservice (thus, you need the server too!), which tries to connect to a Odysseus via webservice.
- Odysseus Studio 2 (Monolithic).product - (located in de.uniol.inf.is.odysseus.monolithic.feature) - This combines server and client into a single product and adds some additional bundles that only work in such a monolithic combination.
For the first time, the easiest way is to start the "Odysseus Studio 2 (MemoryStoreMonolithic).product". Open this file and go to the tab "Overview". Click "Synchronize" under "Testing" and afterwards click "Launch an Eclipse application" to run Odysseus (you can alternatively run it in debug mode if you want).
When Odysseus Studio (the GUI) comes up, you have to insert some credentials. A default user is "System" and his password is "manager", the tenant can be left empty. Now Odysseus should have been startedbe up and running.
...
Additional Information
Logging
Odysseus comes with the Simple Logging Facade for Java (SLF4J). To use logging add the de.uniol.inf.is.odysseus.slf4j bundle. In this bundle you can find the log4j.properties to configure the logging behaviour.
...
Features
Since Odysseus is an OSGi based application it is devided into several bundles (the bunch of projects you checked out and imported before). To keep the overview of all bundles, they are combined to features. Each feature reflects a special functionality of Odysseus. thus, we have a core.feature that encapsulate all minimal needed bundles or the studio.feature that contains all bundles for the RCP aka GUI of Odysseus (what we call Studio).
...