NEW (29.01.2024): We will change some dependency handling! For development with eclipse you must install the m2e PDE Integration into the Eclipse IDE.
- Help - Install New Software…
- Use the m2e Update Site: https://download.eclipse.org/technology/m2e/releases/latest/
- Select m2e PDE Integration
- Finish the installation
After the installation it can be used in the PDE Target Editor.
06.02.2024: Due to a bug in Eclipse, you will need to use the latest eclipse version (2024-03): https://www.eclipse.org/downloads/packages/release/2024-03/
Nearly everything in Odysseus is designed to be replaced or extended. Here are the typical ones:
- Language extensions
- Create a new language (not only for queries, could be a DSL for anything)
- Create a new Odysseus Script Commands (#....)
- Create a new Logical/PQL Operator
- Processing function extensions
- Create new datatypes
- Create new stream object types
- Data Handler
- Create a new wrapper
- Transport handler
- Protocol handler
- Create new functions for expressions and predicates
- Create new aggregation functions
- Create new operators
- Create new schedulers and scheduling strategies
- Create new meta data
Table of Contents
Some OSGi/Eclipse basics
- Bundles
- Aka plugin: An eclipse project
- Each bundle has its own class loader
- MANIFEST.MF: meta data for that bundle (name, version, imports, exports…)
- In Odysseus: a module that encapsulates functions
- Fragment
- A special bundle that will not exist allone but together with a host bundle
- Same class loader as host bundle
- Used to extend host bundle
- We do not use this anymore, better approach is declarative services
- Declarative Services
- OSGi way of dependency injection
- Defined by so called components
- Can provide functions by interfaces or use (bind/unbind) implementations by interfaces à examples later
- Feature: a feature is a collection of bundles
- Define a set of bundles, that belong together and builds some functionality (e.g. each wrapper has its own feature)
- An update site provides features
- A bundle can be part of many features
- Update-site:
- A collection of features that can be installed in Odysseus
- On the same way, as in Eclipse („Install new software“)
- Via command on ther server
- Via Odysseus-Script
- Product:
- A product is a runnable software (with an application)
- Can be defined by bundles or features
- We only use features to define products
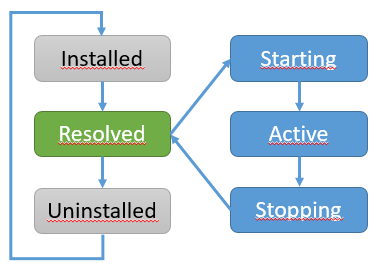
OSGi Life Cycle
- Each bundle has a life cycle
- Installed: A bundle (with correct Metadata is installed)
- Resolved: All dependencies (MANIFEST) are found
- Uninstalled: removed from runtime
- Active: a bundle is activated
- E.g. call of bundle activator
- Remark: there is no need to start a bundle, if the bundle should only provide classes (as a library)
- Eclipse tries to resolve dependencies lazy, if this cannot be done, the bundle stays installed --> bundle cannot be used
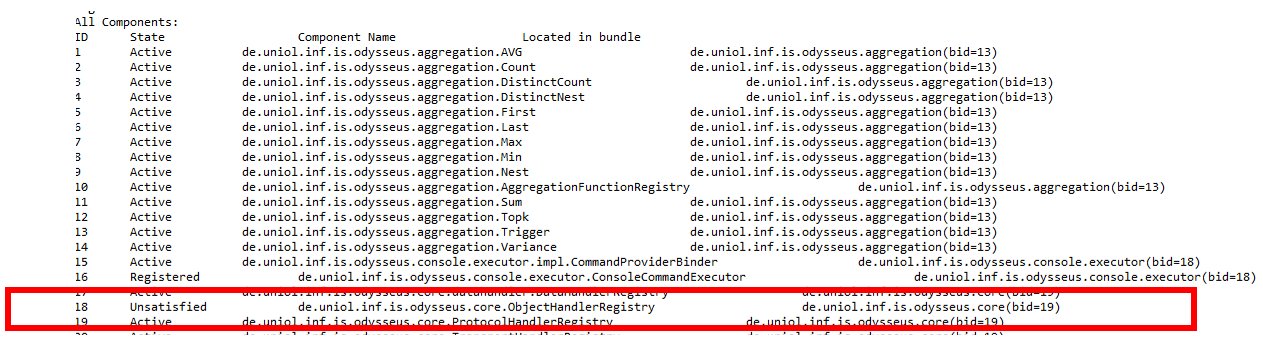
OSGi debugging
TODO: Check commands with apache felix console
- When an application (product) gets started with –console (as in Odysseus always), there is a console available
- ss shows all currently available bundles and their current life cycle state
- Sometimes, there are problems because dependencies are missing (INSTALLED)
- Typical problem: The dependency defined in the MANIFEST.MF was not added to any feature
- diag <id> shows the missing dependencies
- Again: Resolved is no “problem” ;-)

- ls: shows all currently installed (declarative) services
- Unsatisfied: Some dependencies cannot be found
- Use comp <id> to determine missing dependencies
Setting up
See also some newer slides
Setting up
This section describes how to set up Eclipse and Odysseus for development.
New:
1. Prerequisites
You will need the following tools:
- Java 11 17 OpenJDK
- Eclipse for RCP and RAP Developers (Important! Do not use a standard eclipse version!)
- GIT client (you can use git from command line or with a tool of your choice)
2. Checkout Source Code
Remark: Under windows it is best to use a folder, that is not inside the user home path (because of long file names). A good option would be a base folder git somewhere on the root level.
There are different ways to create new functionality with Odysseus. The first way should be used if you want to add something new to Odysseus (e.g. a new wrapper) but do not want to change the common code base. This should be the preferred way of development with Odysseus:
...
| Code Block | ||
|---|---|---|
| ||
// in your newRepo Folder! git remote set-url origin <new url> |
ODT
There is also a first approach for an eclipse plugin that could make processing easier. For this, install the Odysseus Development Tools from the following update site
| Code Block |
|---|
https://odysseus.informatik.uni-oldenburg.de/download/odt/ |
and uncheck "Group items by category".
After installation and restart there is a new menu option Odysseus where you can create an initial project:
Option 2: Extending an Existing Odysseus Plugin/Extending Odysseus Core
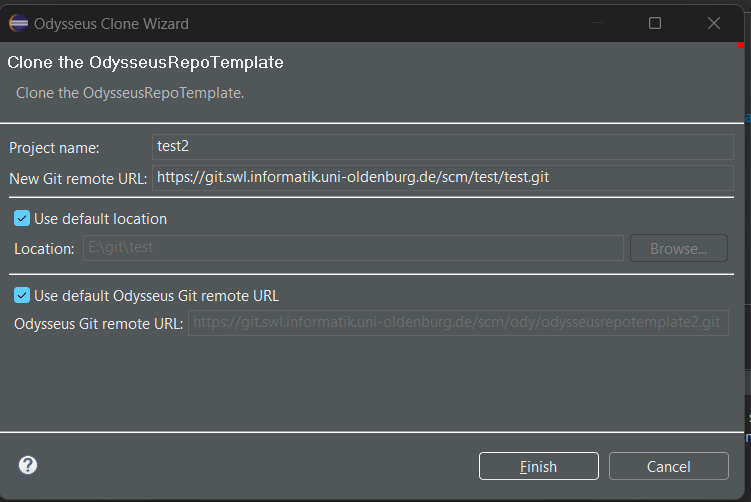
You want to extend an existing plugin from Odysseus or extend the core system? Then, instead of cloning the empty template from Option 1, clone the repository of the plugin you want to develop on. If the plugin is hosted in our Bitbucket, you can probably find it in one of the projects in this list: https://git.swl.informatik.uni-oldenburg.de/projects . Look for example at the Odysseus, the Odysseus Incubation and Odysseus Wrapper projects. When you have found the repository you want to use, check it out and don't forget to clone the submodule to get the target platform definition and the standard products:
...
| Code Block |
|---|
git clone <your repo URL>
cd <repo>
git submodule init
git submodule update
cd odysseus_dev
git checkout master
cd ..
git remote set-url origin <new url> |
3. Setup Eclipse
After Eclipse started, you have to import all bundles (these are the parts of Odysseus and are equal to an Eclipse project). Use "File -> Import -> Existing Projects into Workspace" to import them into Eclipse as follows:
...
You now see a lot of compiler error. This is because the target platform ist is not set.
The target platform can be found in the project targetplatform.
...